Installation
Here's how to install and set up the RAW Fusion 360 Add-In:
-
Initial Setup: Installation is typically required only once, or when updates to the program are released.
-
File Extraction: Upon receiving the file (e.g., RobotAtWork.zip), extract its contents and place them in a location of your choice on your computer.
-
Adding to Fusion 360:
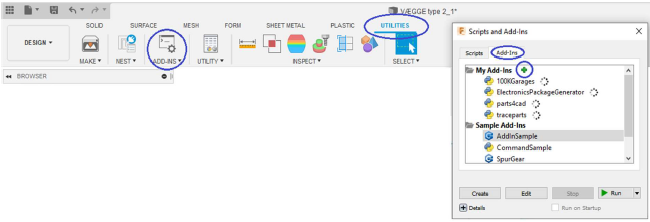
- Open Fusion 360 and navigate to the “UTILITIES” tab.
- Click on “Scripts and Add-Ins” and then select the “Add-Ins” tab.
- Press the green plus icon to add a new Add-In.
- Locate and select the folder containing the Add-In. The name of the Add-In should now appear in the list under "My Add-Ins".
- Click on the Add-In and check the box for “Run on Startup” to ensure it loads automatically each time you start Fusion 360.

- Using the Add-In:
- A new button will appear under the "UTILITIES" tab.
- This button opens a tool selector, where you can choose the tool for which you want to create a package.
- Alternatively, you can select the tool directly using the dropdown arrow under the button.
- A new button will appear under the "UTILITIES" tab.

With these steps, the Add-In is now successfully installed.